
When my husband and I bought our house as newbie homeowners, we decided to make a little tiny change the day we moved in …. we thought we’d just take down the ceiling quick, to expose the beams, before we moved our stuff in. we thought it might be a little messy, so better to do it quickly before.

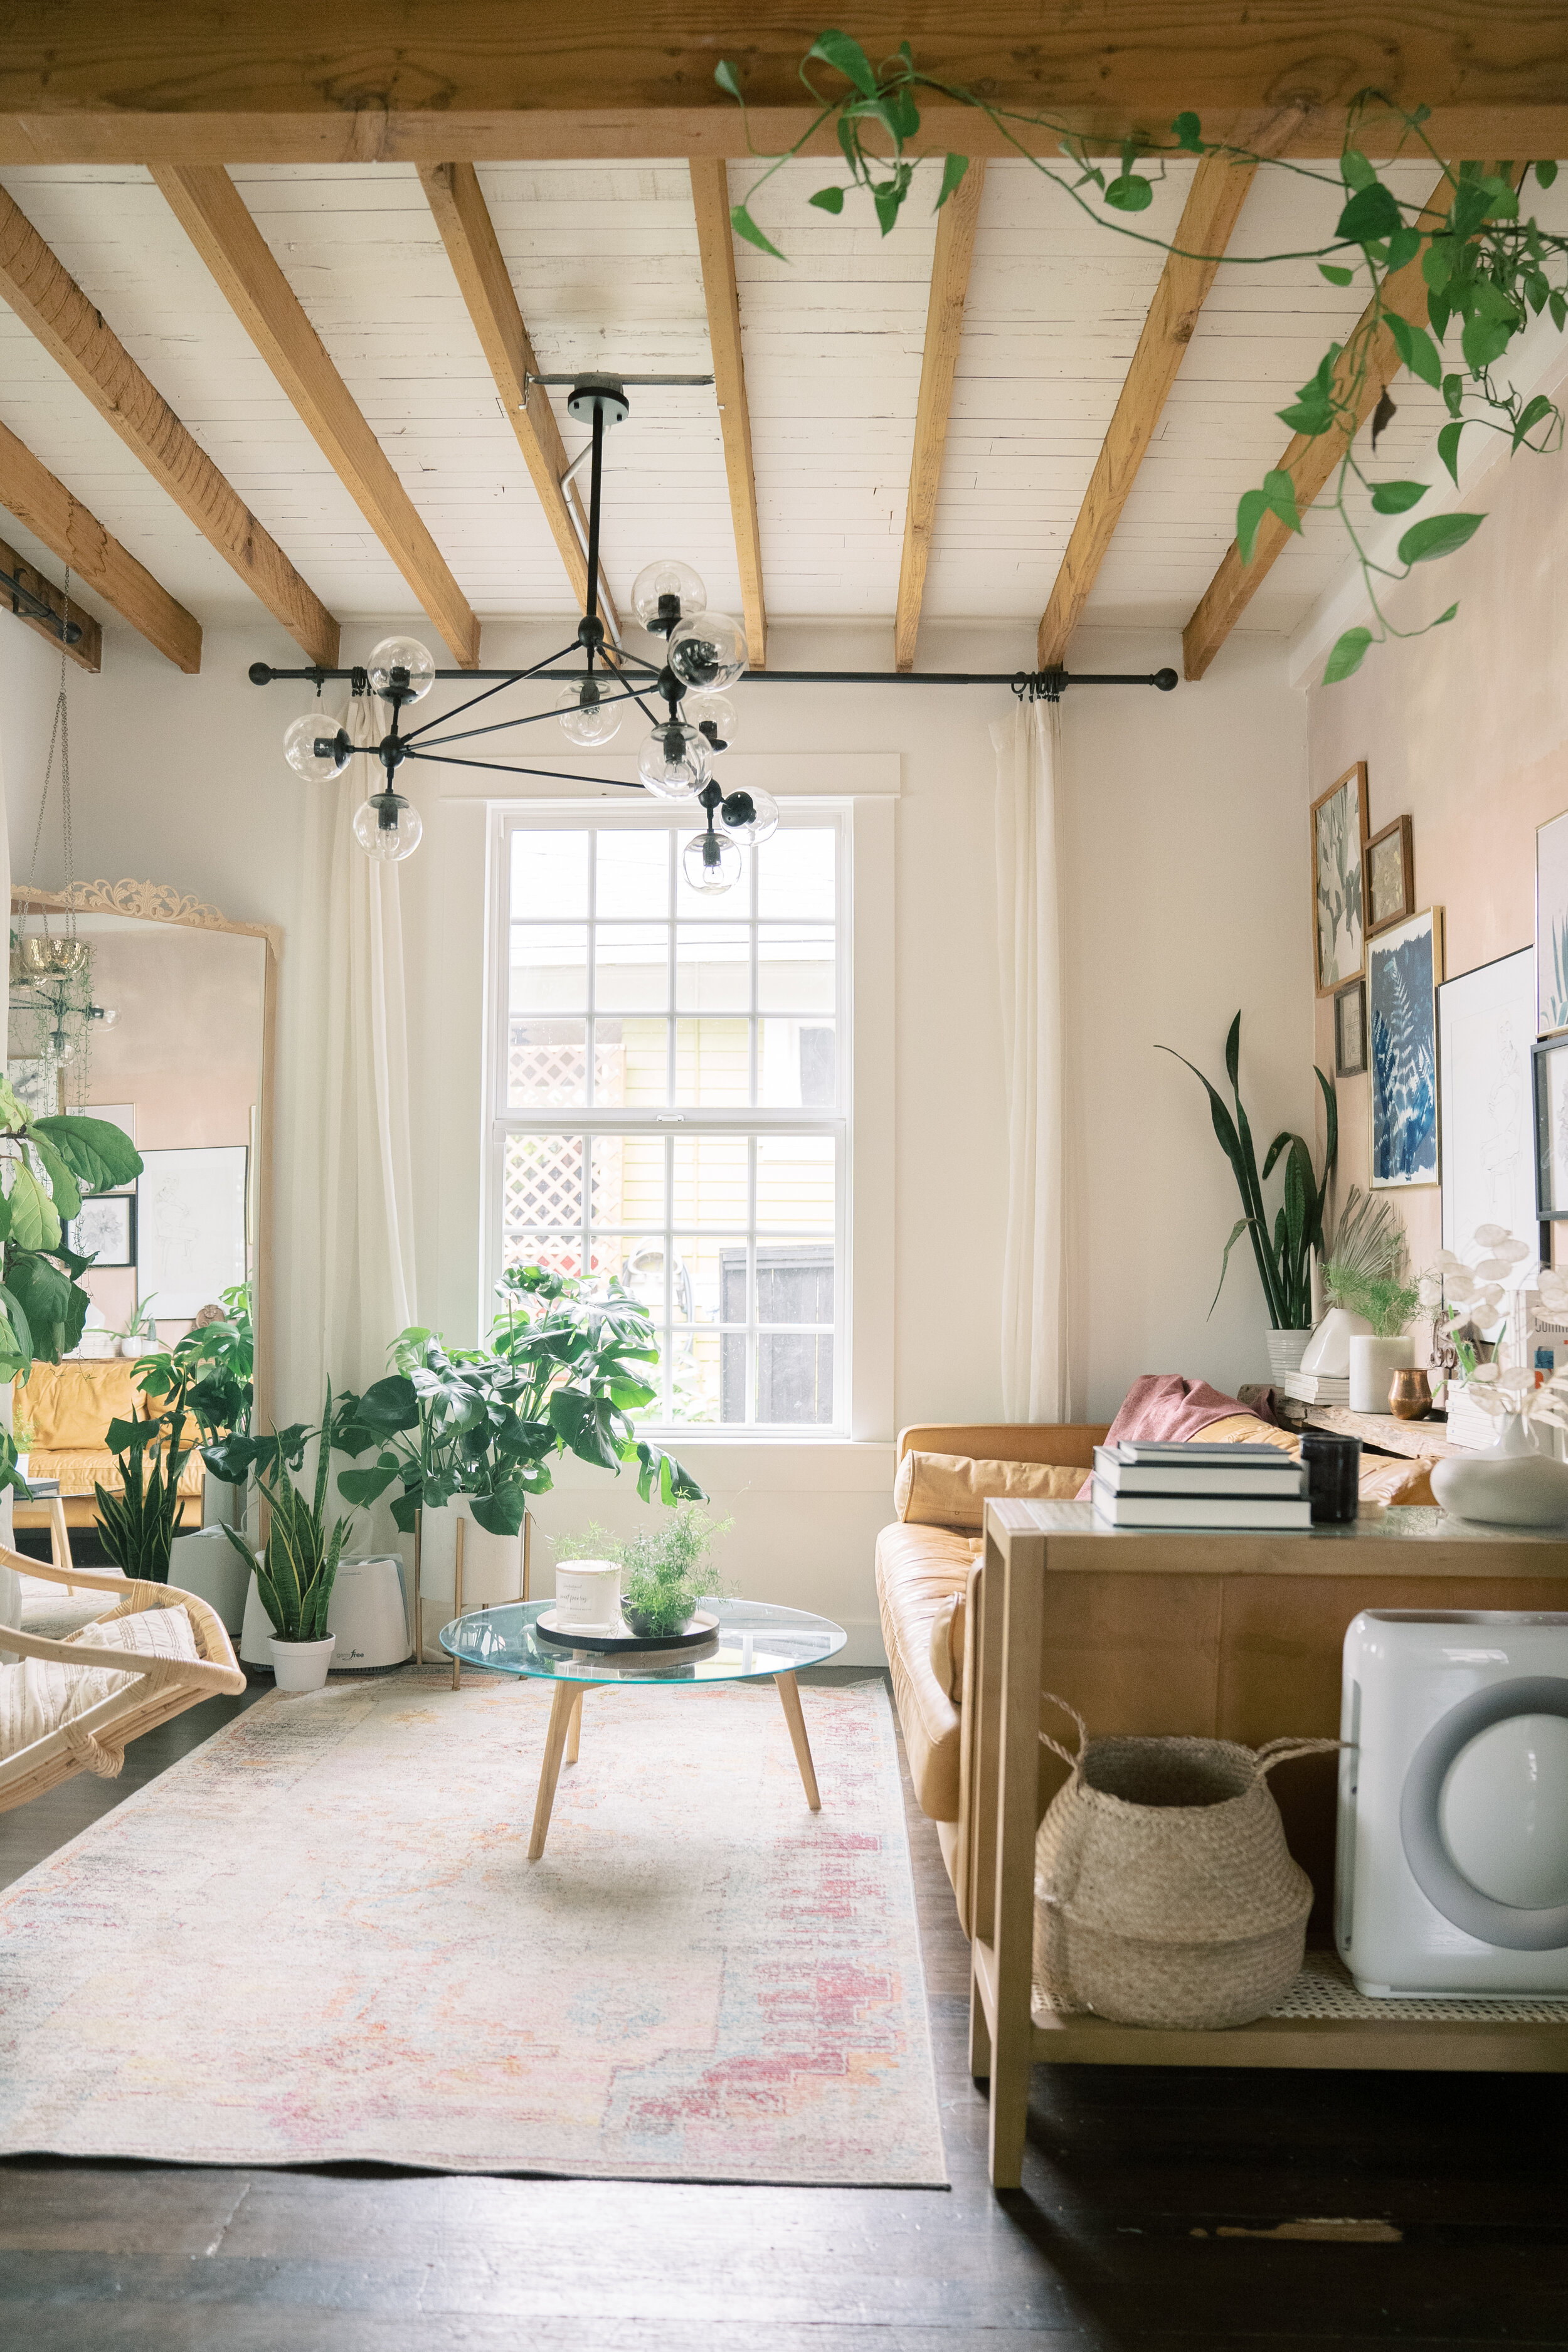
I love the look exposed beams give a space. the lines provide a visual illusion of more space and height for small spaces, which is huge (literally) for us because our entire home is just over 1,000 square feet, and there are 5 people living here.


we talked to contractors, and no one wanted to take on this project for a litany of reasons, but i was undeterred. We decided that we were going to expose our beams come hell or high water, and even though we had exactly zero experience in home renovation, we were going to take it on ourselves.


here’s how it really went, in case you wanted to attempt this project yourself.
TL:DR- i don’t regret it whatsoever. it is my favorite thing about my house, i’m shocked more people don’t do it. it was harder than expected, took longer than expected, and there are a few things to make sure you do if you’re going to go this route.
When we purchased our home, the ceilings were really low. i had a sneaking suspicion that above that very low ceiling was the original ceiling- and that some time in the 70s they had installed a faux ceiling that was lower to maintain better heat in the winter. the ceiling height just didn’t make a lot of sense architecturally, and i knew there was extra square footage being hidden!

Even if there wasn’t extra square footage there, i still wanted to expose the beams because i love the look and even that 6 inches in between the beams of additional height would be welcome.
we were told by every contractor that we couldn’t/shouldn’t expose the beams. the reasons given were as follows: it wasn’t meant to be like that originally, and wasn’t intended by the architect, so it shouldn’t be done. it will look bad. support beams and subfloor aren’t ‘pretty’ and won’t look polished. it will hurt the resale value of your home because it isn’t the norm. people just don’t do it. when people walk around upstairs it will drop dust on those sitting downstairs. you will loose the sound insulation between floors by taking out the sheetrock ceiling, and it will be super loud. it will be too hard to drywall between the beams. you’ll see the wiring and plumbing for the upstairs if you expose the ceiling. we just don’t want to do it.
I found counter points to every single one of the concerns listed above (which you’ll discover below), and because we couldn’t find a contractor willing to do it for us, we set to work on this project ourselves.
1) Tear down the existing ceiling
okay, here is what you need to know if you want to do this yourself: our project snowballed into a full gut for a few reasons, but yours may be MUCH easier. if your beams are right above your ceiling (99.9% of cases)- you have a much simpler project ahead of you. take down the ceiling, put up a little bit of drywall between your beams, and you’re good to go.
In our case, the ceiling we took down was a ‘faux’ ceiling that had been installed in the 70s., so we would also need to take down the original ceiling, and address the ‘wall situation’ between the lower ceiling, and the actual ceiling/beams. we decided the best thing to do in our particular situation was to just take down all the drywall in every room because our electrical and plumbing really needed to be replaced, and then we could add insulation at the same time.
If you want to read about the hilarity of this spur-of-the-moment full house gut, go read this post.
so our project snowballed into electrical, plumbing, insulation, and thennnnn walls and ceiling. but your project will likely avoid all that chaos, and just involve your ceiling.

you can see the original ceiling above this dropped ceiling in this photo. two for the price of one!

You can see the dilemma- we needed to now address the walls as well as the ceiling. but, look at all that additional space! and we hadn’t even exposed the beams yet!

beams and upstairs subfloor are now exposed, but we have the wall situation to contend with…

the realities of how much debris there was.

you’re going to need more than a trash can.

soooo it all just came out. we had to commit. hopefully, your exposed beams experience will be different.
2) hire an electrician to deal with the wires
because you can’t have bare wires exposed in your ceiling, they will need to wire any fixtures through some conduit. We don’t have any plumbing in our ceiling because we don’t have an upstairs bathroom, so we didn’t have to worry about hiding pipes. if you’re anything like us, you will receive some push-back “but you’re going to see the conduit! but people just don’t DO this. but… this isn’t….usual.” just nod, smile, and continue forth. it’s going to be absolutely fine.
3) Drywall between the beams
drywalling between the beams was a real beast- you need to cut each piece of drywall to fit in between those beams like a puzzle. TLDR: i would not suggest doing this part yourself, and searching (convincing) a drywall company to take it on.
when you are putting up a wall, you screw in a board (called drywall) onto the wood frame of the house. to cover the seams of these boards meeting, you spread some drywall mud (kind of like cake icing) in the seams, and tape it up. when the mud dries, you give it a sand, and repeat the process 5 times to create a perfect seamless surface. (you can watch videos of how to drywall on youtube… which is exactly where i learned) when you have more seams, there is more mudding/sanding. and since we were fitting drywall into the space between each beam there were LOADS OF SEAMS that needed to be mudded/sanded.
once the mudding/sanding was complete, we could paint the walls, which seals the mud and keeps everything in place and looking nice. would i do this project myself again? NEVER. it took us months. it may have taken years (literally). I don’t actually remember because I try to block this part of the renovation out of my mind because inconveniently, I also have a texture sensory issue with sand/dust/chalk (along with misophonia, which is also triggered by the sound of sanding). The fact I was literally sanding chalky substances every day for months on end had a real effect on my mental health (panic attacks, anxiety, and depression). The fact that this particular drywalling project was 100,000% harder than a normal drywalling project because of all the puzzle pieces in between beams made it so much worse and took so much longer.
If you want to expose your beams, hire someone to drywall. full stop. the rest you can conceivably and reasonably do yourself.

drywall is up on the main wall, but we have not yet put in the drywall between the beams. this is important to do to get that exposed beam look- otherwise it just looks unfinished and weird.

drywall being put between the beams, and one round of mud/tape on the wall.

after one round of sanding the dried mud. that white stuff on the floor is all drywall dust. it’s actually a dark wood floor. MY MIND IS CRINGING RIGHT NOW FROM PTSD.
did i mention that we actually lived here through all of this? with two children and two dogs? i forgot to mention that part? good times. good times.

I also learned that drywall dust really damages your hair. it sucks all the natural oils out like a chalk. my hair was in the worst condition of my life during these months of drywalling, and i wish i would have worn a hat. once i realized what was damaging my hair it was pretty much too late.
2) Clean up/Sand the beams
Your beams are likely going to be covered in cobwebs, a hundred years of dust and grime, and thousands upon thousands of nails. you’ll need to pull every nail out manually with the back teeth of a hammer, and sand off the grime. I have a friend who exposed her beams during a full house gut like ours and they sand blasted the beams to clean them up but she says she wouldn’t do that method again because the mess was so intense it stopped other renovation on their home for weeks. We sanded ours by hand, which is what I would suggest you do too.
We rented scaffolding, got 4 power sanders (one for each hand for my husband and myself), stood on the scaffolding and just started doing one beam at a time- 4 sanders going. Once we’d finish that beam, we’d pull ourselves to the next beam (scaffolding is on wheels) and sand that one. It was actually a very efficient process with both of us working at the same time with 4 sanders.
yes, it really is needed. 100 year old beams were never meant to be seen, so they are absolutely nasty. perhaps newer construction wouldn’t need to sand the beams, but plan on it being 100% necessary anyway, and then maybe you’ll be pleasantly surprised if your home is newer.
now is the time to consider oiling or staining your beams. we tried a few tests of linseed oil, as well as stain, but ultimately decided we loved the bare sanded wood best. which was great, because this was the only time in history of DIY projects we made things easier on ourselves.

this is the best-looking area of the ceiling. other parts are in significantly worse shape. I am undeterred.

old nob and tube wiring and random bits of scrap wood randomly nailed into beams. all of this needed to be taken out and cleaned up.

do not be dismayed if it looks nasty. all of this can be easily cleaned up and sanded out. it will be okay!

Dustin taking out random pieces of wood nailed into the beams. every single one of those holes on the bottom of the beams had a nail in it, which were all pulled out manually. this is typical of a 100 year old home with lath and plaster ceilings- but your reno will likely be A THOUSAND TIMES less messy and less nails if you have a more modern drywall ceiling. our situation is worst case scenario, and we still did it all by hand.
3) paint your ceiling
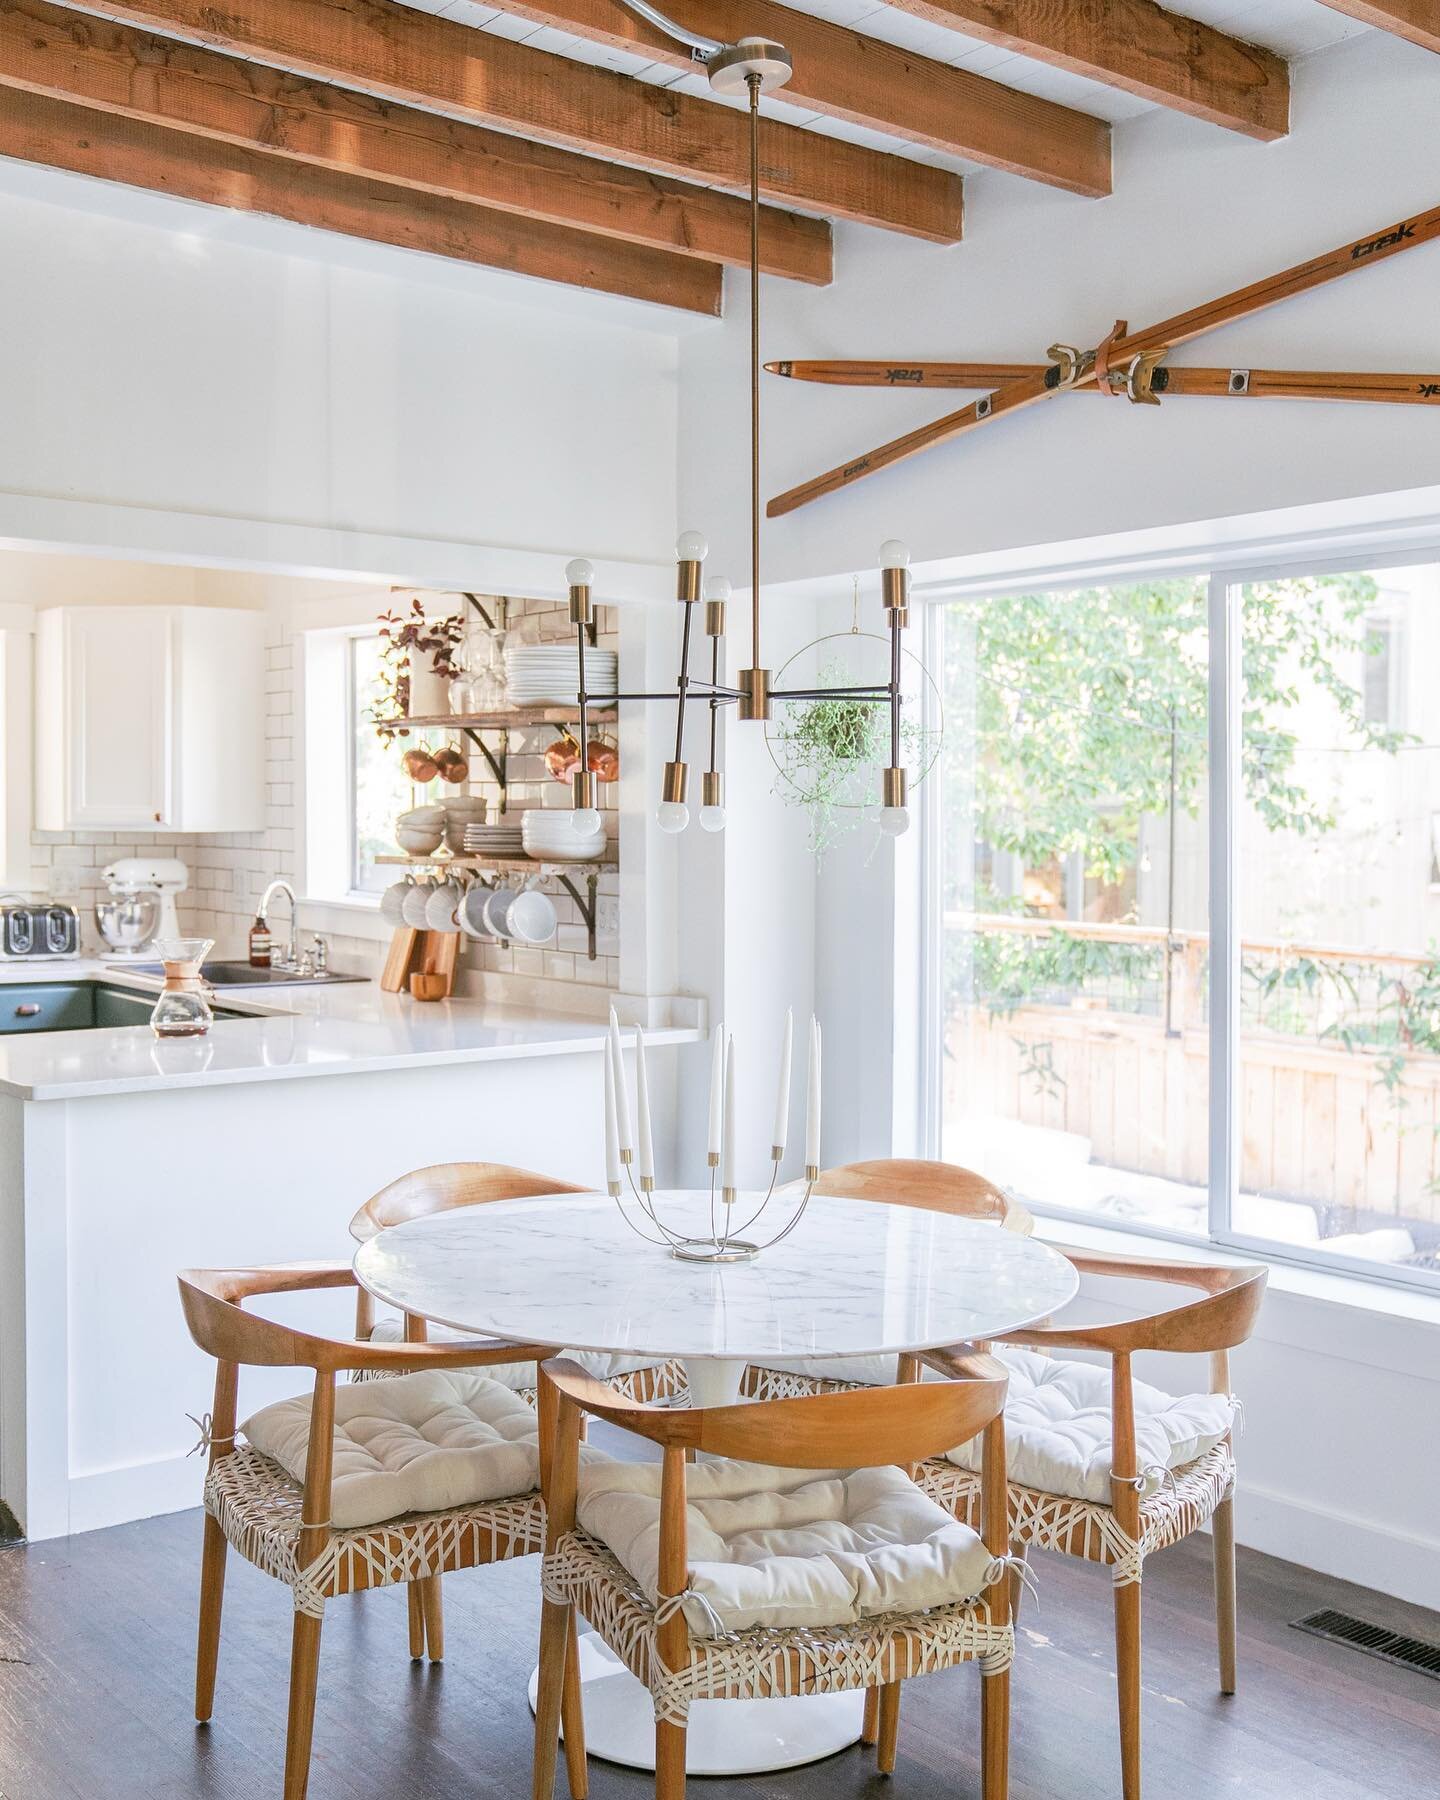
We had considered leaving the entire ceiling wood, but with our dark floors and tiny square footage, it was just too dark (especially in our pacific northwest winters). We had also considered painting the entire ceiling white, but then you loose some of the visual aesthetic of those lines that I love so much.
Obviously, I chose the hardest option- which was to paint in between the beams, and leave the beams their natural wood color. This would give me the greatest visual sense of height, brighten up the space, and leave a little bit of history with keeping our 100 year old beams in their natural state.
Again using the scaffolding on wheels, we individually taped each and every beam with plastic and painters tape. this was quite the process, but with both of us working together it took 1 weekend.
we rented a paint sprayer from home depot, and primed/painted the ceiling. this took just a few hours, but was so much fun, i wish it would have taken longer. We rented our paint sprayer, but we honestly should have just invested in our own, because since then there have been SO many times we needed to use a paint sprayer (cabinet painting, playhouse painting, basement painting, etc). below is the one i would buy now, based on extensive reviews and research.
BUT THIS IS IMPORTANT!!!! you need to use this specific shellac primer to prime bare wood so the wood tannins don’t show through. if you don’t know what i mean, google ‘wood tannins showing through white paint’. if you don’t want to paint your ceiling white (and want it a darker color) this likely won’t be an issue. but if you want it white like mine, you don’t want the oils and tannins in wood turning your beautiful white paint yellow. this is the paint to use , and don’t let anyone at home depot try to mansplain to you that you can use any other brand.
you can’t. ask me how i know.
This is the only paint I’ve ever found that effectively blocks wood tannins from showing through white paint, and I have tried every.other.brand.
spray the Zinsser BIN primer on, then spray your final top coat (mine is Falling Snow by Sherwin Williams).
Always remember to remove painters tape after the paint has dried, but before the paint has fully cured (so, within 24 hours). if you wait until the paint has fully cured you’ll end up pulling off chunks of paint because the paint has sealed permanently to the painters tape.
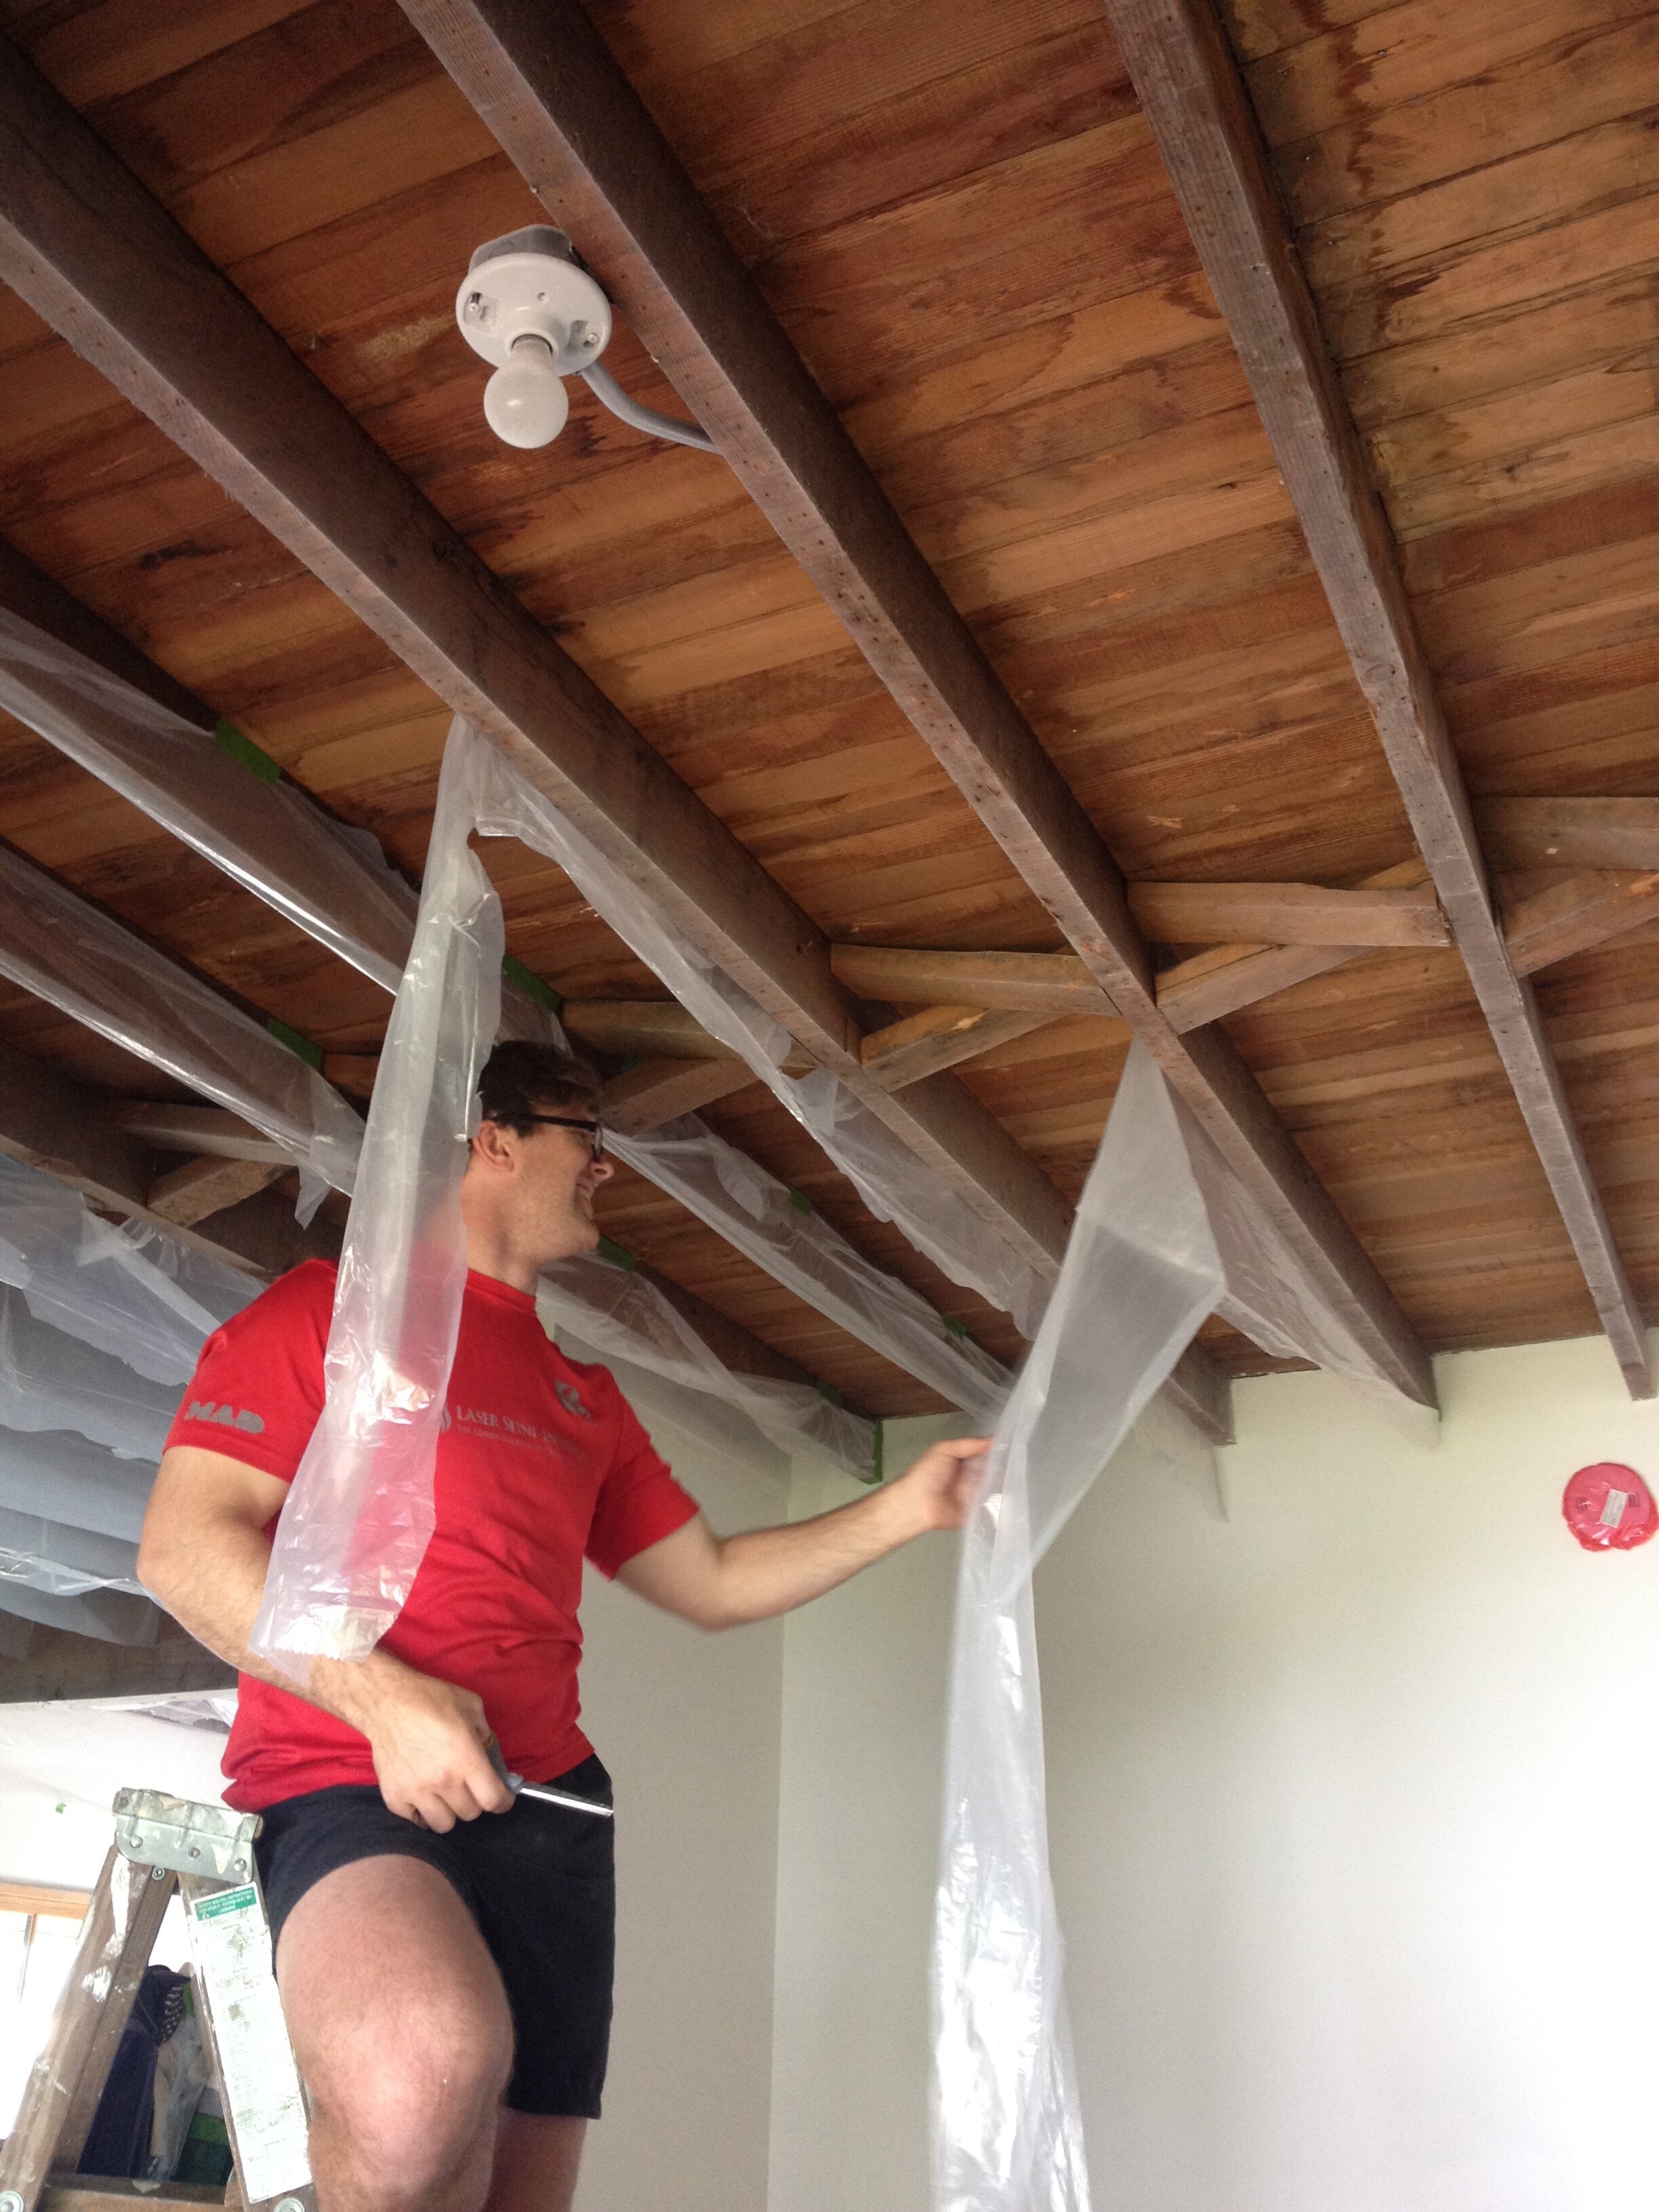
we cut a plastic drop cloth into long strips, and then worked together to tape it into place for each.and.every.beam.

extremely time consuming- extremely worth it.

you can see the scaffolding we rented here- we’d stand on it to sand the beams, then use the ceiling to pull ourselves along to the next beam.

my favorite day of renovation ever- nothing will ever top this moment. after months and months of work to get to this point- i was finally doing the last step to our exposed beam project- the entire reason we started renovating in the first place! plus, paint guns are THE BEST INVENTION EVER. so much fun. remembe- zinger BIN primer first, then paint.
4) Address the Upstairs Floor Considerations
After you paint, you could theoretically be done. but there are some downsides to having exposed beams. you are essentially exposing not just the beams, but also the upstairs subfloor. this means that you are eliminating that natural sound insulation that a normal sheetrock ceiling provides. Therefore it can be noisy when people walk around upstairs and you are downstairs. I had also read online that when people walk upstairs it can create a little dust falling down from the floor boards rubbing together. I was not interested in having dust fall down onto my head while my children romped around upstairs, so we decided to take some preventative measures.
Because we were already replacing the flooring upstairs, we did an additional steps. After we pulled up the carpet, i discovered floors in terrible condition. i wouldn’t even call them ‘floors’. this ‘upstairs’ was actually just an attic originally, so i don’t think the floors were ever really meant to be floors in the traditional sense. We added a layer of plywood to create a level surface, then added a thick layer of sound insulation underlayment to the floor upstairs underneath the wood flooring. if you were looking at our floor like a lasagne it would be: Support beams, subfloor (this is what you see downstairs in the ceiling) then plywood, then sound proofing insulation, then finally the real wood flooring we installed new, and then paint (yes, we painted our wood floor white upstairs… with three kids. we still love it 7 years later). the sound proofing provides sound insulation so we don’t hear every single thing that is going on upstairs, but it also provides cushioning so when kids are bouncing around upstairs on the wood floor, it cushions the impact so the subfloor (aka downstairs ceiling) doesn’t move around and drop dust on those people sitting downstairs.

this is what i found after pulling up our carpet upstairs

and in some cases, the flooring wasn’t even real flooring…

putting down a layer of plywood to cover the subfloor/nasty carpet adhesive to give a level surface. Then we put down the soundproofing underlayment. THEN we put down our wood flooring. plenty of sound insulation now.

but not before i found this magnetic word. and yes, our house was haunted, which i will have to write a separate post about. it lasted only for a few months, and i tried to explain the haunting in ANY scientific way i could, and came up short. i never believed in ghosts until i experienced a haunting myself. I’ll have to write a separate post about what we experienced (it wasn’t bad, nor particularly scary. but definitely unsettling)
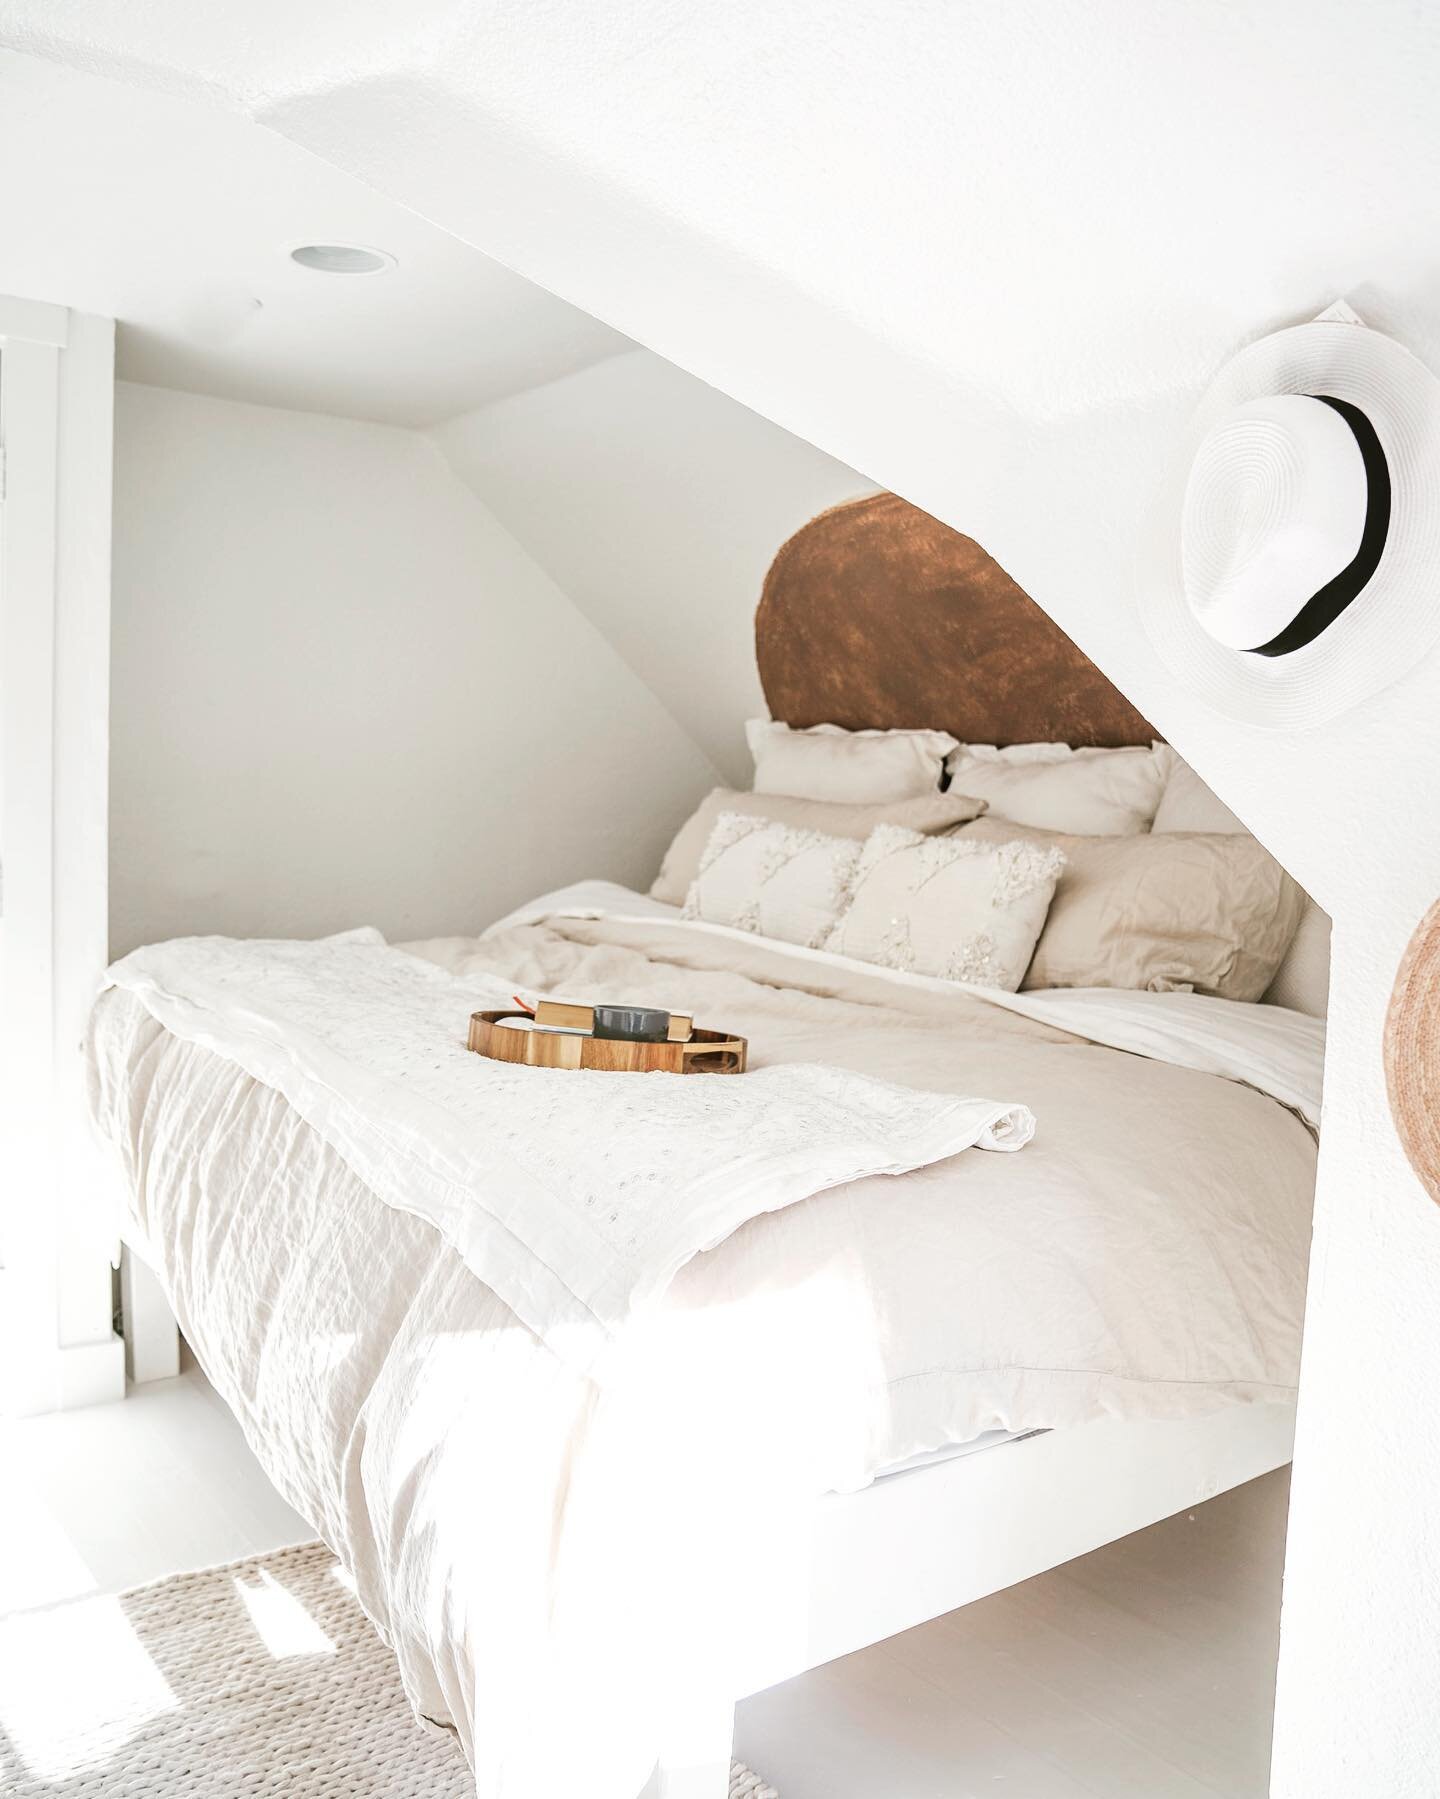
our finished white floors in the upstairs now

PS- you can make this super easy, ultra-beginner level window seat at this link: http://www.lexiafrank.com/house-of-lf/2020/9/5/an-easy-diy-alcove-window-bench
In summary- i would absolutely do this project again. i would outsource the drywalling to a contractor, but otherwise, it is a no-brainer for me. it was messy, it was long and awful, but mostly because we were doing the work all ourselves. the payoff has been immense, i love the look, and because i live and work at home, it’s really nice to have a space that i love both visually and functionally.
Would you ever attempt this in your own home?
if you’re doing it right now, tag me on instagram so i can see your progress, and follow along on our current renovation projects on our 1907 portland bungalow over at H O U S E OF L F


This post may contain affiliate links, that when you click on and purchase a product, I may earn a small commission, but it costs you nothing extra. it does help support me and allow me to continue to share these resources and experiences with you! thank you for buying through the above links!